ボタンがロールオーバーされた時や押された時に表示される画像を変更する
ボタンはボタンの上にマウスが乗っている時(ロールオーバーしている時)やマウスが押された時などに枠線を変えたり背景色を変えたりして分かるようにしていますが、それぞれの状態になった時にボタンに表示されている画像を別の画像に変えることができます。ここではボタンがロールオーバーされた時や押された時に表示される画像を変更する方法について解説します。
(2022 年 04 月 11 日公開 / 2022 年 04 月 11 日更新)
ロールオーバーされた時の画像を設定する
ボタンの上にマウスが乗っている状態をロールオーバーといいます。ボタンはマウスが上に乗っている時はボタンの枠線を太く表示して区別が付くようになっています。

ロールオーバーの時に通常とは別の画像をボタンに表示するには JButton クラスの親クラスである AbstractButton クラスで定義されている setRolloverIcon メソッドを使います。
public void setRolloverIcon(Icon rolloverIcon)
反転した状態のボタンのアイコンを設定します。

パラメータ:
rolloverIcon - 「反転した状態のボタン」の表示に使用されるアイコン
引数には表示したい画像を表す Icon インターフェースを実装したクラスのオブジェクトを指定します。 Java では Icon インターフェースを実装したクラスとして ImageIcon クラスが用意されており、今回は ImageIcon クラスのオブジェクトを指定してみます。( ImageIcon クラスについては「ImageIconクラス」を参照して下さい)。
実際の使い方は次のようになります。
ImageIcon icon = new ImageIcon("./img/sample.png");
ImageIcon rollover_icon = new ImageIcon("./img/roll.png");
JButton button = new JButton(icon);
button.setRolloverIcon(rollover_icon);
それでは簡単なサンプルプログラムを作って試してみます。テキストエディタで次のように記述したあと、 JSample10_1.java という名前で保存します。
import javax.swing.JFrame;
import javax.swing.JButton;
import javax.swing.JPanel;
import javax.swing.ImageIcon;
import java.awt.Container;
import java.awt.BorderLayout;

class JSample8_1 extends JFrame{
  public static void main(String args[]){
    JSample8_1 frame = new JSample8_1("MyTitle");
    frame.setVisible(true);
  }

  JSample8_1(String title){
    setTitle(title);
    setBounds(100, 100, 600, 400);
    setDefaultCloseOperation(JFrame.EXIT_ON_CLOSE);

    ImageIcon icon1 = new ImageIcon("./check.png");
    ImageIcon icon2 = new ImageIcon("./batsu.png");

    JButton button1 = new JButton(icon1);

    JButton button2 = new JButton();
    button2.setIcon(icon2);

    JPanel p = new JPanel();
    p.add(button1);
    p.add(button2);

    Container contentPane = getContentPane();
    contentPane.add(p, BorderLayout.CENTER);
  }
}
次のようにコンパイルを行います。
javac JSample10_1.java

コンパイルが終わりましたら実行します。
java JSample10_1
ボタンを 2 つ追加しました。 2 つ目のボタン(右のボタン)はロールオーバーした時の画像を別で設定しています。

左のボタンにマウスを乗せた場合はボタンに表示されている画像に変化はありませんが、右のボタンにマウスを乗せた場合は別の画像が表示されます。


ボタンが押された時の画像を設定する
ボタンが押されるとボタンの背景が通常よりも濃い色で塗りつぶされるなど区別が付くようになっています。

ボタンが押された時に通常とは別の画像を設定するには JButton クラスの親クラスである AbstractButton クラスで定義されている setPressedIcon メソッドを使います。
public void setPressedIcon(Icon pressedIcon)
押された状態のボタンのアイコンを設定します。

パラメータ:
pressedIcon - 「押されたボタン」の表示に使用されるアイコン
引数には setRolloverIcon メソッドの時と同じく表示したい画像を表す Icon インターフェースを実装したクラスのオブジェクトを指定します。
実際の使い方は次のようになります。
ImageIcon icon = new ImageIcon("./img/sample.png");
ImageIcon pressed_icon = new ImageIcon("./img/pressed.png");
JButton button = new JButton(icon);
button.setPressedIcon(pressed_icon);
それでは簡単なサンプルプログラムを作って試してみます。テキストエディタで次のように記述したあと、 JSample10_2.java という名前で保存します。
import javax.swing.JFrame;
import javax.swing.JButton;
import javax.swing.JPanel;
import javax.swing.ImageIcon;
import java.awt.Container;
import java.awt.BorderLayout;
import java.awt.Dimension;

class JSample10_2 extends JFrame{
  public static void main(String args[]){
    JSample10_2 frame = new JSample10_2("MyTitle");
    frame.setVisible(true);
  }

  JSample10_2(String title){
    setTitle(title);
    setBounds(100, 100, 600, 400);
    setDefaultCloseOperation(JFrame.EXIT_ON_CLOSE);

    ImageIcon icon1 = new ImageIcon("./button1.png");
    ImageIcon pressed_icon = new ImageIcon("./button3.png");

    JButton button1 = new JButton(icon1);
    button1.setPreferredSize(new Dimension(180, 100));

    JButton button2 = new JButton(icon1);
    button2.setPreferredSize(new Dimension(180, 100));
    button2.setPressedIcon(pressed_icon);

    JPanel p = new JPanel();
    p.add(button1);
    p.add(button2);

    Container contentPane = getContentPane();
    contentPane.add(p, BorderLayout.CENTER);
  }
}
次のようにコンパイルを行います。
javac JSample10_2.java

コンパイルが終わりましたら実行します。
java JSample10_2
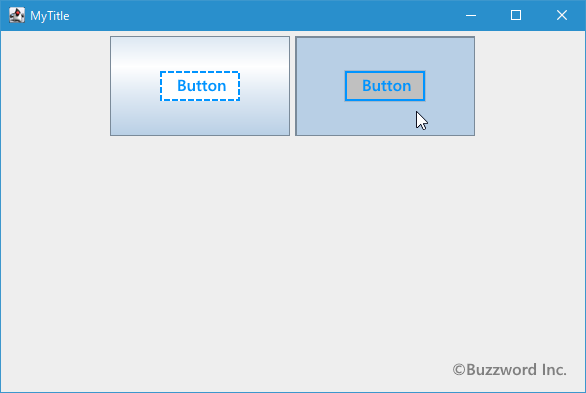
ボタンを 2 つ追加しました。 2 つ目のボタン(右のボタン)はボタンが押された時の画像を別で設定しています。

左のボタンを押した時はボタンに表示されている画像に変化はありませんが、右のボタンを押した時は別の画像が表示されます。


ボタンが無効になった時の画像を設定する
ボタンが無効になっていると通常とは異なる表示のされ方がされるため区別が付くようになっています。

ボタンが無効になっている時に任意の画像を表示するように設定するには JButton クラスの親クラスである AbstractButton クラスで定義されている setDisabledIcon メソッドを使います。
public void setDisabledIcon(Icon disabledIcon)
無効な状態のボタンのアイコンを設定します。

パラメータ:
disabledIcon - 無効な状態のボタンの表示に使用されるアイコン
引数にはsetRolloverIconメソッドの時と同じく表示したい画像を表すIconインターフェースを実装したクラスのオブジェクトを指定します。
実際の使い方は次のようになります。
ImageIcon icon = new ImageIcon("./img/sample.png");
ImageIcon disabled_icon = new ImageIcon("./img/disabled.png");

JButton button = new JButton(icon);
button.setDisabledIcon(pressed_icon);
ボタンを無効に設定する方法については「ボタンの有効/無効を切り替える」をご参照ください。
それでは簡単なサンプルプログラムを作って試してみます。テキストエディタで次のように記述したあと、 JSample10_3.java という名前で保存します。
import javax.swing.JFrame;
import javax.swing.JButton;
import javax.swing.JPanel;
import javax.swing.ImageIcon;
import java.awt.Container;
import java.awt.BorderLayout;
import java.awt.Dimension;

class JSample10_3 extends JFrame{
  public static void main(String args[]){
    JSample10_3 frame = new JSample10_3("MyTitle");
    frame.setVisible(true);
  }

  JSample10_3(String title){
    setTitle(title);
    setBounds(100, 100, 600, 400);
    setDefaultCloseOperation(JFrame.EXIT_ON_CLOSE);

    ImageIcon icon1 = new ImageIcon("./button1.png");
    ImageIcon disabled_icon = new ImageIcon("./button4.png");

    JButton button1 = new JButton(icon1);
    button1.setPreferredSize(new Dimension(180, 100));

    JButton button2 = new JButton(icon1);
    button2.setPreferredSize(new Dimension(180, 100));
    button2.setEnabled(false);
    button2.setDisabledIcon(disabled_icon);

    JPanel p = new JPanel();
    p.add(button1);
    p.add(button2);

    Container contentPane = getContentPane();
    contentPane.add(p, BorderLayout.CENTER);
  }
}
次のようにコンパイルを行います。
javac JSample10_3.java

コンパイルが終わりましたら実行します。
java JSample10_3
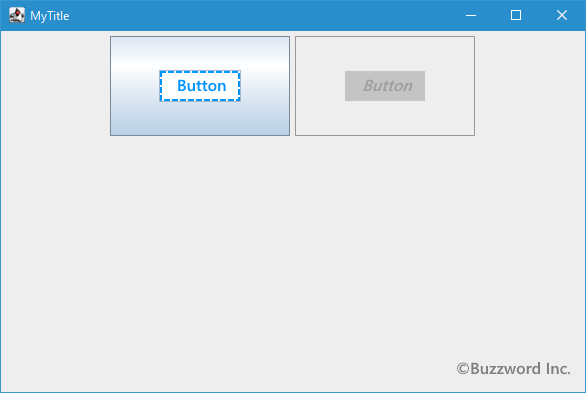
ボタンを 2 つ追加しました。 2 つ目のボタン(右のボタン)はボタンが無効になった時の画像を別で設定しています。

-- --
ボタンがロールオーバーされた時や押された時に表示される画像を変更する方法について解説しました。
( Written by Tatsuo Ikura )

著者 / TATSUO IKURA
これから IT 関連の知識を学ばれる方を対象に、色々な言語でのプログラミング方法や関連する技術、開発環境構築などに関する解説サイトを運営しています。